Improve image resolution with machine learning super resolution on mobile
Learn how to build an application to improve image resolution using ONNX Runtime Mobile, with a model that includes pre and post processing.
You can use this tutorial to build the application for Android or iOS.
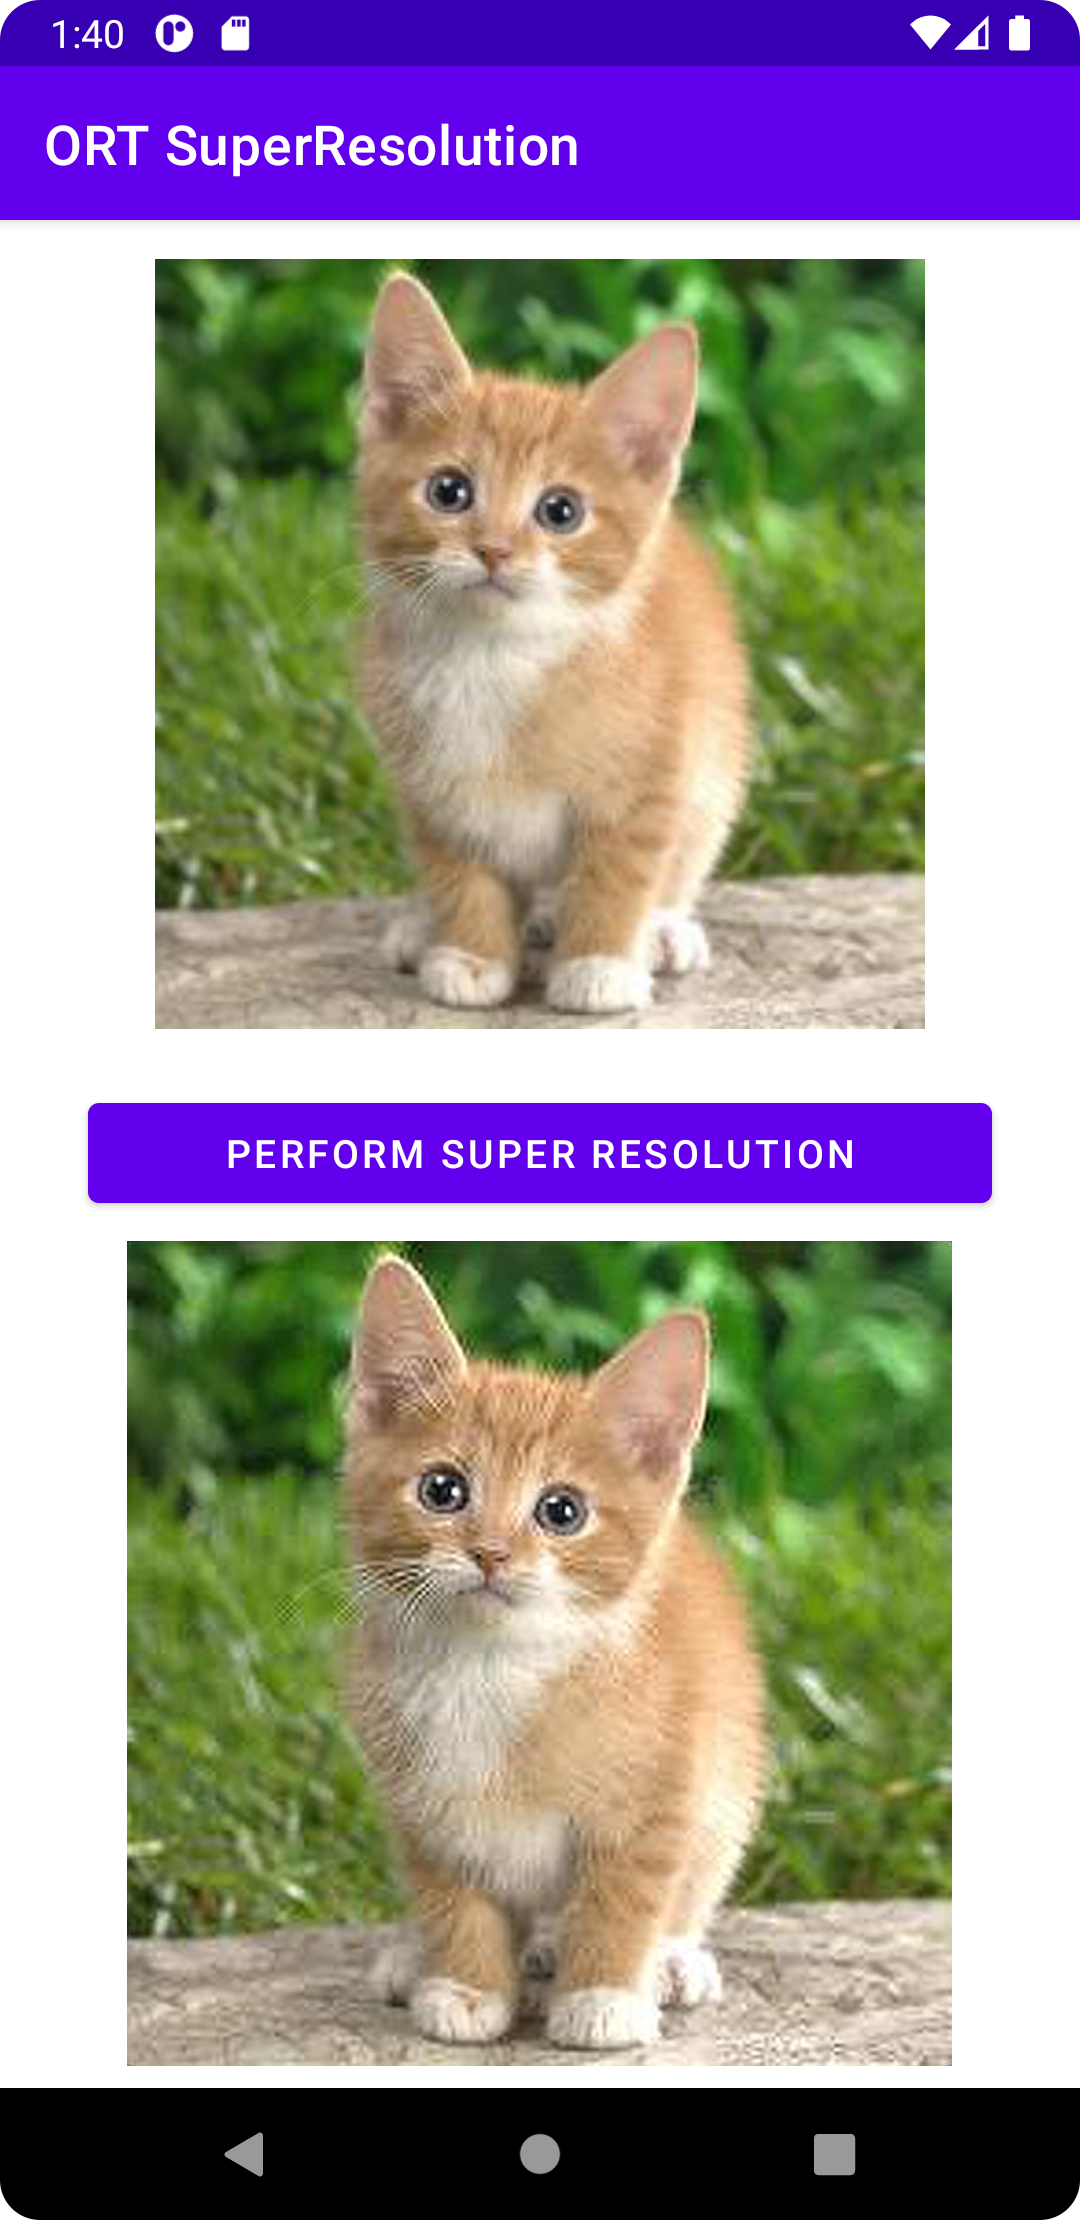
The application takes an image input, performs the super resolution operation when the button is clicked and displays the image with improved resolution below, as in the following screenshot.
Contents
Prepare the model
The machine learning model used in this tutorial is based on the one used in the PyTorch tutorial referenced at the bottom of this page.
We provide a convenient Python script that exports the PyTorch model into ONNX format and adds pre and post processing.
-
Before running this script, install the following python packages:
 pip install torch
 pip install pillow
 pip install onnx
 pip install onnxruntime
 pip install --index-url https://aiinfra.pkgs.visualstudio.com/PublicPackages/_packaging/ORT-Nightly/pypi/simple/ onnxruntime-extensions
A note on versions: the best super resolution results are achieved with ONNX opset 18 (with its support for the Resize operator with anti-aliasing), which is supported by onnx 1.13.0 and onnxruntime 1.14.0 and later. The onnxruntime-extensions package is a pre-release version. The release version will be available soon.
-
Then download the script and test image from the onnxruntime-extensions GitHub repository (if you have not already cloned this repository):
curl https://raw.githubusercontent.com/microsoft/onnxruntime-extensions/main/tutorials/superresolution_e2e.py > superresolution_e2e.py curl https://raw.githubusercontent.com/microsoft/onnxruntime-extensions/main/tutorials/data/super_res_input.png > data/super_res_input.png -
Run the script to export the core model and add pre and post processing to it
python superresolution_e2e.py
After the script runs, you should see two ONNX files in the folder in the location that you ran the script:
pytorch_superresolution.onnx
pytorch_superresolution_with_pre_and_post_processing.onnx
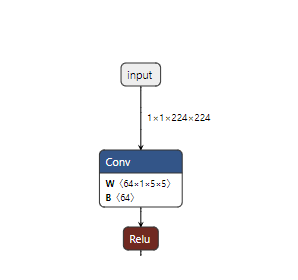
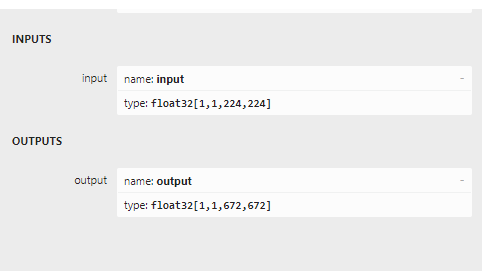
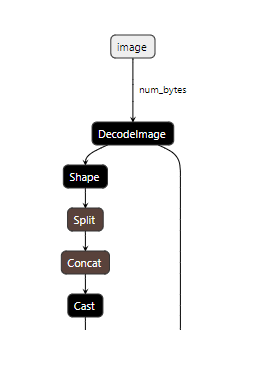
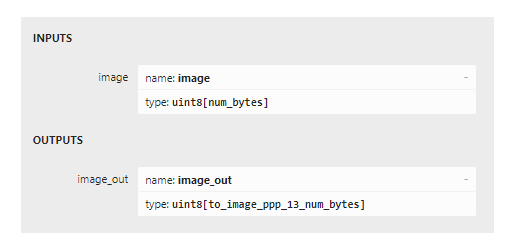
If you load the two models into netron you can see the difference in inputs and outputs between the two. The first two images below show the original model with its inputs being batches of channel data, and the second two show the inputs and outputs being the image bytes.
Now it’s time to write the application code.
Android app
Pre-requisites
- Android Studio Dolphin 2021.3.1 Patch + (installed on Mac/Windows/Linux)
- Android SDK 29+
- Android NDK r22+
- An Android device or an Android Emulator
Sample code
You can find full source code for the Android super resolution app in GitHub.
To run the app from source code, clone the above repo and load the build.gradle file into Android studio, build and run!
To build the app, step by step, follow the following sections.
Code from scratch
Setup project
Create a new project for Phone and Tablet in Android studio and select the blank template. Call the application super_resolution or similar.
Dependencies
Add the following dependencies to the app build.gradle:
implementation 'com.microsoft.onnxruntime:onnxruntime-android:latest.release'
implementation 'com.microsoft.onnxruntime:onnxruntime-extensions-android:latest.release'
Project resources
-
Add the model file as a raw resource
Create a folder called
rawin thesrc/main/resfolder and move or copy the ONNX model into the raw folder. -
Add the test image as an asset
Create a folder called
assetsin the main project folder and copy the image that you want to run super resolution on into that folder with the filename oftest_superresolution.png
Main application class code
Create a file called MainActivity.kt and add the following pieces of code to it.
-
Add import statements
import ai.onnxruntime.* import ai.onnxruntime.extensions.OrtxPackage import android.annotation.SuppressLint import android.os.Bundle import android.widget.Button import android.widget.ImageView import android.widget.Toast import androidx.activity.* import androidx.appcompat.app.AppCompatActivity import kotlinx.android.synthetic.main.activity_main.* import kotlinx.coroutines.* import java.io.InputStream import java.util.* import java.util.concurrent.ExecutorService import java.util.concurrent.Executors -
Create the main activity class and add the class variables
class MainActivity : AppCompatActivity() { private var ortEnv: OrtEnvironment = OrtEnvironment.getEnvironment() private lateinit var ortSession: OrtSession private var inputImage: ImageView? = null private var outputImage: ImageView? = null private var superResolutionButton: Button? = null ... } -
Add the
onCreate()methodThis is where we initialize the ONNX Runtime session. A session holds a reference to the model used to perform inference in the application. It also takes a session options parameter, which is where you can specify different execution providers (hardware accelerators such as NNAPI). In this case, we default to running on CPU. We do however register the custom op library where the image encoding and decoding operators at the input and output of the model are found.
override fun onCreate(savedInstanceState: Bundle?) { super.onCreate(savedInstanceState) setContentView(R.layout.activity_main) inputImage = findViewById(R.id.imageView1) outputImage = findViewById(R.id.imageView2); superResolutionButton = findViewById(R.id.super_resolution_button) inputImage?.setImageBitmap( BitmapFactory.decodeStream(readInputImage()) ); // Initialize Ort Session and register the onnxruntime extensions package that contains the custom operators. // Note: These are used to decode the input image into the format the original model requires, // and to encode the model output into png format val sessionOptions: OrtSession.SessionOptions = OrtSession.SessionOptions() sessionOptions.registerCustomOpLibrary(OrtxPackage.getLibraryPath()) ortSession = ortEnv.createSession(readModel(), sessionOptions) superResolutionButton?.setOnClickListener { try { performSuperResolution(ortSession) Toast.makeText(baseContext, "Super resolution performed!", Toast.LENGTH_SHORT) .show() } catch (e: Exception) { Log.e(TAG, "Exception caught when perform super resolution", e) Toast.makeText(baseContext, "Failed to perform super resolution", Toast.LENGTH_SHORT) .show() } } } -
Add the onDestroy method
override fun onDestroy() { super.onDestroy() ortEnv.close() ortSession.close() } -
Add the updateUI method
private fun updateUI(result: Result) { outputImage?.setImageBitmap(result.outputBitmap) } -
Add the readModel method
This method reads the ONNX model from the resources folder.
private fun readModel(): ByteArray { val modelID = R.pytorch_superresolution_with_pre_post_processing_op18 return resources.openRawResource(modelID).readBytes() } -
Add a method to read the input image
This method reads a test image from the assets folder. Currently it reads a fixed image built into the application. The sample will soon be extended to read the image directly from the camera or the camera roll.
private fun readInputImage(): InputStream { return assets.open("test_superresolution.png") } -
Add the method to perform inference
This method calls the method that is at the heart of the application:
SuperResPerformer.upscale(), which is the method that runs inference on the model. The code for this is shown in the next section.private fun performSuperResolution(ortSession: OrtSession) { var superResPerformer = SuperResPerformer() var result = superResPerformer.upscale(readInputImage(), ortEnv, ortSession) updateUI(result); } -
Add the TAG object
companion object {
    const val TAG = "ORTSuperResolution"
}
Model inference class code
Create a file called SuperResPerformer.kt and add the following snippets of code to it.
-
Add imports
import ai.onnxruntime.OnnxJavaType import ai.onnxruntime.OrtSession import ai.onnxruntime.OnnxTensor import ai.onnxruntime.OrtEnvironment import android.graphics.Bitmap import android.graphics.BitmapFactory import java.io.InputStream import java.nio.ByteBuffer import java.util.* -
Create a result class
internal data class Result( var outputBitmap: Bitmap? = null ) {} -
Create the super resolution performer class
This class and its main function
upscaleare where most of the calls to ONNX Runtime live.- The OrtEnvironment singleton maintains properties of the environment and configured logging levels
- OnnxTensor.createTensor() is used to create a tensor made up of the input image bytes, suitable as input to the model
- OnnxJavaType.UINT8 is the data type of the ByteBuffer of the input tensor
- OrtSession.run() run the inference (prediction) on the model to get the output upscaled image
internal class SuperResPerformer(
) {

    fun upscale(inputStream: InputStream, ortEnv: OrtEnvironment, ortSession: OrtSession): Result {
        var result = Result()

        // Step 1: convert image into byte array (raw image bytes)
        val rawImageBytes = inputStream.readBytes()

        // Step 2: get the shape of the byte array and make ort tensor
        val shape = longArrayOf(rawImageBytes.size.toLong())

        val inputTensor = OnnxTensor.createTensor(
            ortEnv,
            ByteBuffer.wrap(rawImageBytes),
            shape,
            OnnxJavaType.UINT8
        )
        inputTensor.use {
            // Step 3: call ort inferenceSession run
            val output = ortSession.run(Collections.singletonMap("image", inputTensor))

            // Step 4: output analysis
            output.use {
                val rawOutput = (output?.get(0)?.value) as ByteArray
                val outputImageBitmap =
                    byteArrayToBitmap(rawOutput)

                // Step 5: set output result
                result.outputBitmap = outputImageBitmap
            }
        }
        return result
    }
Build and run the app
Within Android studio:
- Select Build -> Make Project
- Run -> app
The app runs in the device emulator. Connect to your Android device to run the app on device.
iOS app
Pre-requisites
- Install Xcode 13.0 and above (preferably latest version)
- An iOS device or iOS simulator
- Xcode command line tools
xcode-select --install - CocoaPods
sudo gem install cocoapods - A valid Apple Developer ID (if you are planning to run on device)
Sample code
You can find full source code for the iOS super resolution app in GitHub.
To run the app from source code:
-
Clone the onnxruntime-inference-examples repo
git clone https://github.com/microsoft/onnxruntime-inference-examples cd onnxruntime-inference-examples/mobile/examples/super_resolution/ios -
Install required pod files
pod install -
Open the generated
ORTSuperResolution.xcworkspacefile in XCode(Optional: only required if you are running on device) Select your development team
-
Run the application
Connect your iOS device or simulator, build and run the app
Click the
Perform Super Resolutionbutton to see the app in action
To develop the app, step by step, follow the following sections.
Code from scratch
Create project
Create a new project in XCode using the APP template
Dependencies
Install the following pods:
  # Pods for OrtSuperResolution
  pod 'onnxruntime-c'

  # Pre-release version pods
  pod 'onnxruntime-extensions-c', '0.5.0-dev+261962.e3663fb'
Project resources
-
Add the model file to the project
Copy the model file generated at the beginning of this tutorial into the root of the project folder.
-
Add the test image as an asset
Copy the image that you want to run super resolution on into the root of the project folder.
Main app
Open the file called ORTSuperResolutionApp.swift and add the following code:
import SwiftUI

@main
struct ORTSuperResolutionApp: App {
    var body: some Scene {
        WindowGroup {
            ContentView()
        }
    }
}
Content view
Open the file called ContentView.swift and add the following code:
import SwiftUI

struct ContentView: View {
    @State private var performSuperRes = false

    func runOrtSuperResolution() -> UIImage? {
        do {
            let outputImage = try ORTSuperResolutionPerformer.performSuperResolution()
            return outputImage
        } catch let error as NSError {
            print("Error: \(error.localizedDescription)")
            return nil
        }
    }

    var body: some View {
        ScrollView {
            VStack {
                VStack {
                    Text("ORTSuperResolution").font(.title).bold()
                        .frame(width: 400, height: 80)
                        .border(Color.purple, width: 4)
                        .background(Color.purple)

                    Text("Input low resolution image: ").frame(width: 350, height: 40, alignment:.leading)

                    Image("cat_224x224").frame(width: 250, height: 250)

                    Button("Perform Super Resolution") {
                        performSuperRes.toggle()
                    }

                    if performSuperRes {
                        Text("Output high resolution image: ").frame(width: 350, height: 40, alignment:.leading)

                        if let outputImage = runOrtSuperResolution() {
                            Image(uiImage: outputImage)
                        } else {
                            Text("Unable to perform super resolution. ").frame(width: 350, height: 40, alignment:.leading)
                        }
                    }
                    Spacer()
                }
            }
            .padding()
        }
    }
}

struct ContentView_Previews: PreviewProvider {
    static var previews: some View {
        ContentView()
    }
}
Swift / Objective C bridging header
Create a file called ORTSuperResolution-Bridging-Header.h and add the following import statement:
#import "ORTSuperResolutionPerformer.h"
Super resolution code
-
Create a file called
ORTSuperResolutionPerformer.hand add the following code:#ifndef ORTSuperResolutionPerformer_h #define ORTSuperResolutionPerformer_h #import <Foundation/Foundation.h> #import <UIKit/UIKit.h> NS_ASSUME_NONNULL_BEGIN @interface ORTSuperResolutionPerformer : NSObject + (nullable UIImage*)performSuperResolutionWithError:(NSError**)error; @end NS_ASSUME_NONNULL_END #endif -
Create a file called
ORTSuperResolutionPerformer.mmand add the following code:#import "ORTSuperResolutionPerformer.h" #import <Foundation/Foundation.h> #import <UIKit/UIKit.h> #include <array> #include <cstdint> #include <stdexcept> #include <string> #include <vector> #include <onnxruntime_cxx_api.h> #include <onnxruntime_extensions.h> @implementation ORTSuperResolutionPerformer + (nullable UIImage*)performSuperResolutionWithError:(NSError **)error { UIImage* output_image = nil; try { // Register custom ops const auto ort_log_level = ORT_LOGGING_LEVEL_INFO; auto ort_env = Ort::Env(ort_log_level, "ORTSuperResolution"); auto session_options = Ort::SessionOptions(); if (RegisterCustomOps(session_options, OrtGetApiBase()) != nullptr) { throw std::runtime_error("RegisterCustomOps failed"); } // Step 1: Load model NSString *model_path = [NSBundle.mainBundle pathForResource:@"pt_super_resolution_with_pre_post_processing_opset16" ofType:@"onnx"]; if (model_path == nullptr) { throw std::runtime_error("Failed to get model path"); } // Step 2: Create Ort Inference Session auto sess = Ort::Session(ort_env, [model_path UTF8String], session_options); // Read input image // note: need to set Xcode settings to prevent it from messing with PNG files: // in "Build Settings": // - set "Compress PNG Files" to "No" // - set "Remove Text Metadata From PNG Files" to "No" NSString *input_image_path = [NSBundle.mainBundle pathForResource:@"cat_224x224" ofType:@"png"]; if (input_image_path == nullptr) { throw std::runtime_error("Failed to get image path"); } // Step 3: Prepare input tensors and input/output names NSMutableData *input_data = [NSMutableData dataWithContentsOfFile:input_image_path]; const int64_t input_data_length = input_data.length; const auto memoryInfo = Ort::MemoryInfo::CreateCpu(OrtDeviceAllocator, OrtMemTypeCPU); const auto input_tensor = Ort::Value::CreateTensor(memoryInfo, [input_data mutableBytes], input_data_length, &input_data_length, 1, ONNX_TENSOR_ELEMENT_DATA_TYPE_UINT8); constexpr auto input_names = std::array{"image"}; constexpr auto output_names = std::array{"image_out"}; // Step 4: Call inference session run const auto outputs = sess.Run(Ort::RunOptions(), input_names.data(), &input_tensor, 1, output_names.data(), 1); if (outputs.size() != 1) { throw std::runtime_error("Unexpected number of outputs"); } // Step 5: Analyze model outputs const auto &output_tensor = outputs.front(); const auto output_type_and_shape_info = output_tensor.GetTensorTypeAndShapeInfo(); const auto output_shape = output_type_and_shape_info.GetShape(); if (const auto output_element_type = output_type_and_shape_info.GetElementType(); output_element_type != ONNX_TENSOR_ELEMENT_DATA_TYPE_UINT8) { throw std::runtime_error("Unexpected output element type"); } const uint8_t *output_data_raw = output_tensor.GetTensorData<uint8_t>(); // Step 6: Convert raw bytes into NSData and return as displayable UIImage NSData *output_data = [NSData dataWithBytes:output_data_raw length:(output_shape[0])]; output_image = [UIImage imageWithData:output_data]; } catch (std::exception &e) { NSLog(@"%s error: %s", __FUNCTION__, e.what()); static NSString *const kErrorDomain = @"ORTSuperResolution"; constexpr NSInteger kErrorCode = 0; if (error) { NSString *description = [NSString stringWithCString:e.what() encoding:NSASCIIStringEncoding]; *error = [NSError errorWithDomain:kErrorDomain code:kErrorCode userInfo:@{NSLocalizedDescriptionKey : description}]; } return nullptr; } if (error) { *error = nullptr; } return output_image; } @end
Build and run the app
In XCode, select the triangle build icon to build and run the app!