Deploy high performance question-answer model on AzureML with ONNX Runtime
This tutorial takes a BERT model from HuggingFace, converts it to ONNX, and deploys the ONNX model with ONNX Runtime through AzureML.
In the following sections, we use the HuggingFace BERT model trained with Stanford Question Answering Dataset (SQuAD) dataset as an example. You can also train or fine-tune your own question answer model.
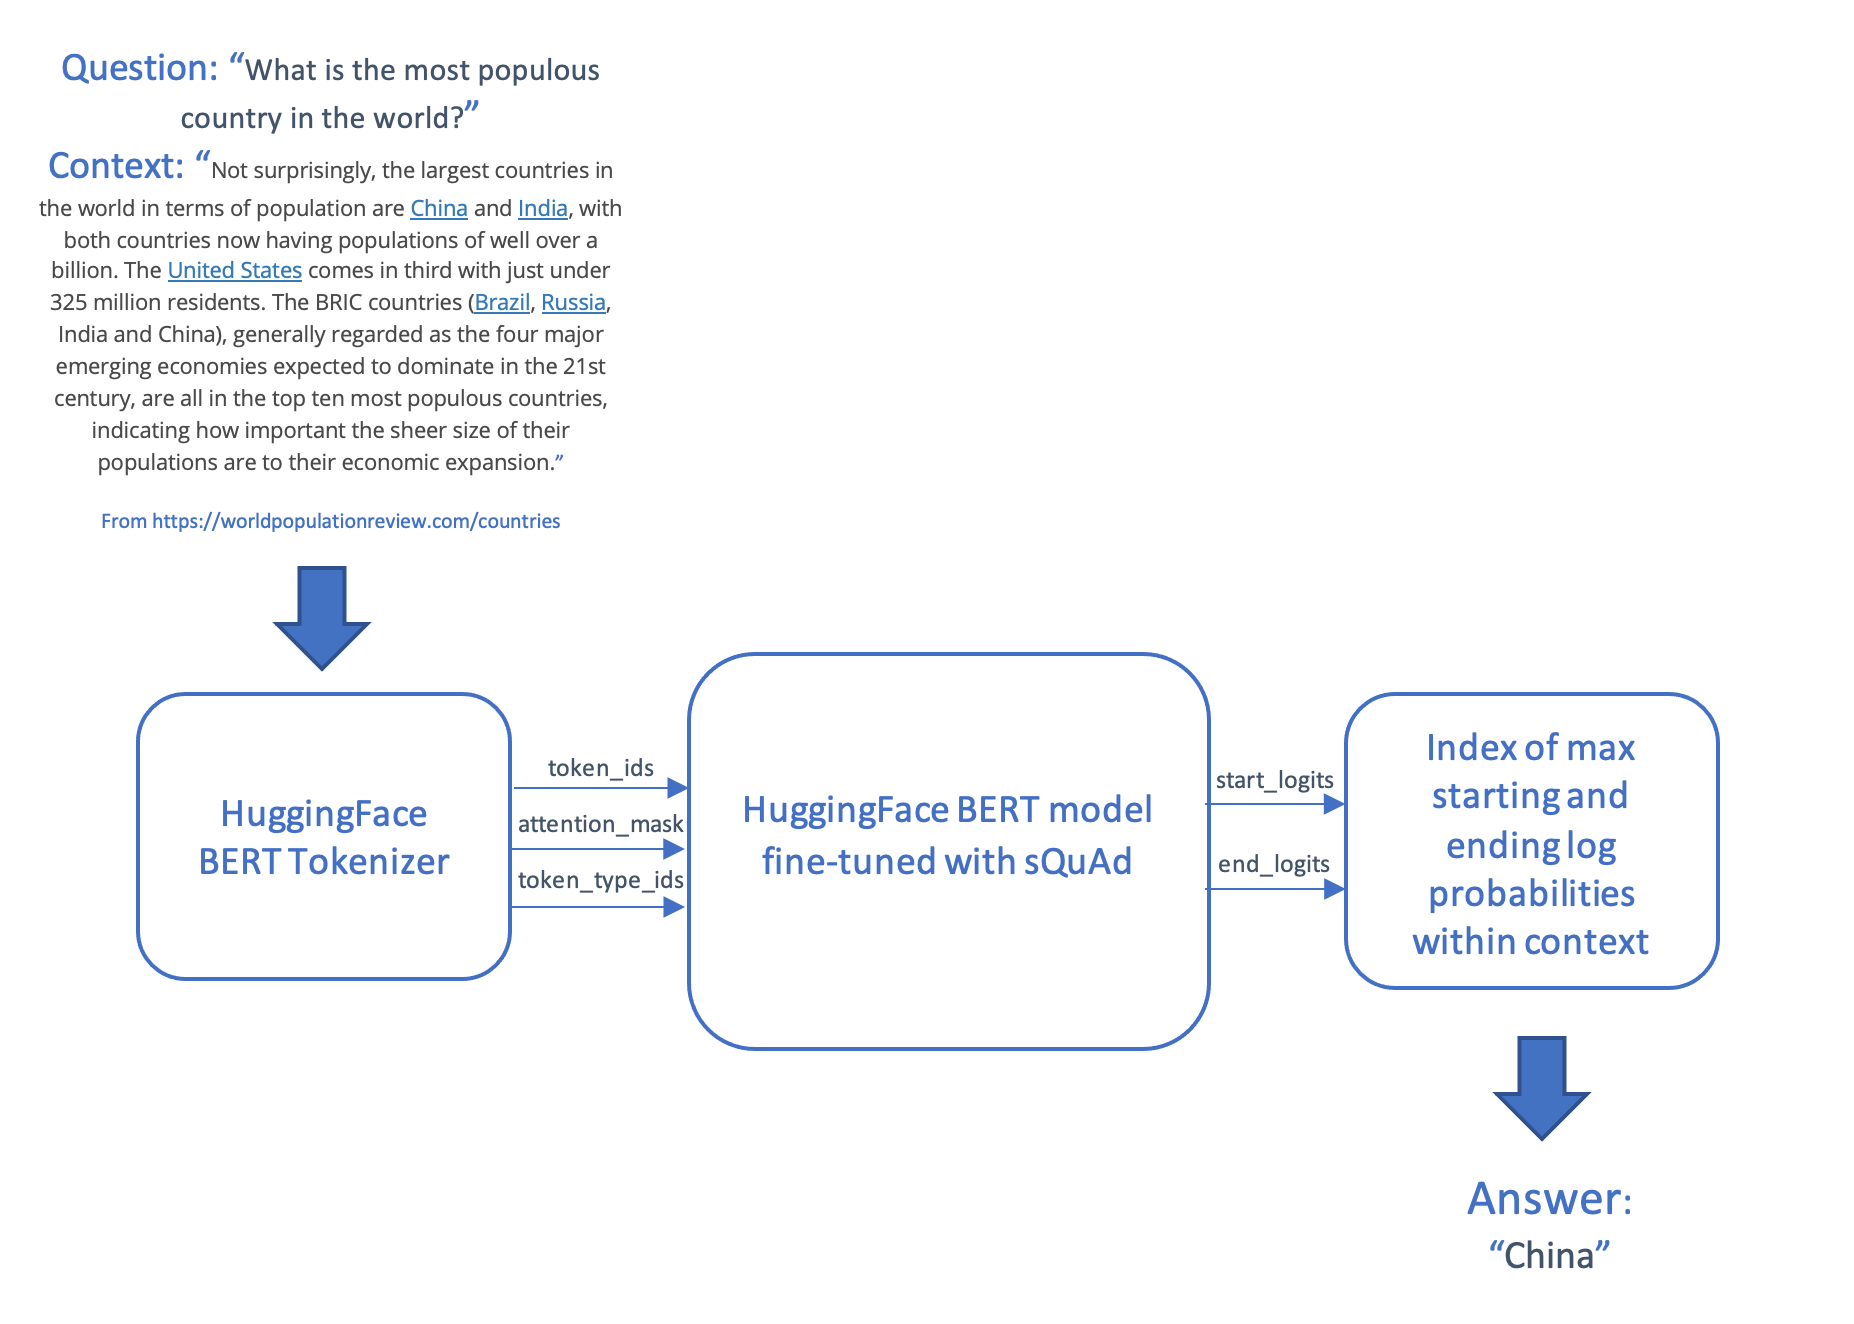
The question answer scenario takes a question and a piece of text called a context, and produces answer, which is a string of text taken from the context. This scenario tokenizes and encodes the question and the context, feeds the inputs into the transformer model and generates the answer by producing the most likely start and end tokens in the context, which are then mapped back into words.
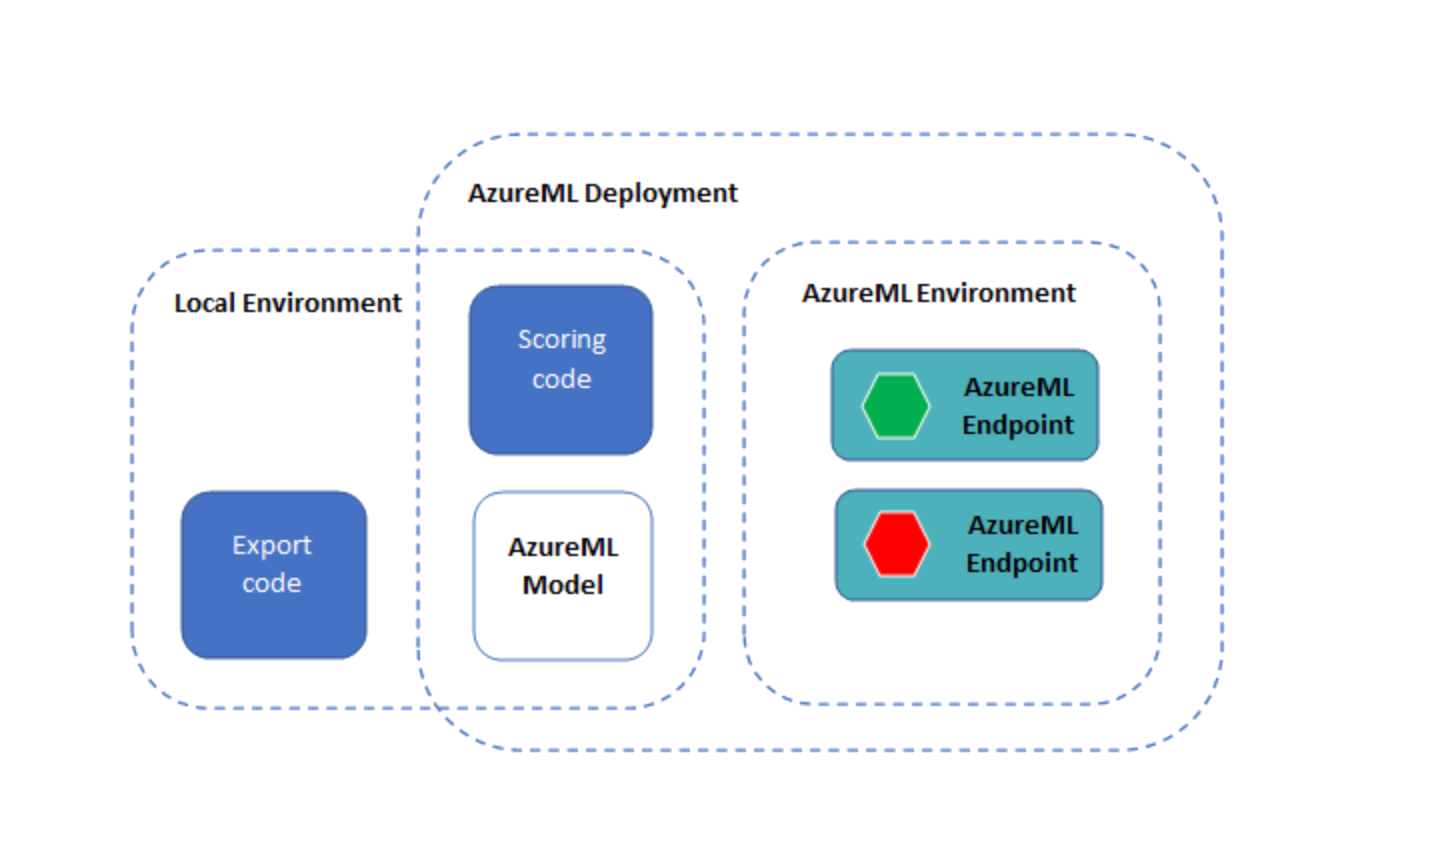
The model and scoring code are then deployed on AzureML using an online endpoint.
Contents
- Pre-requisites
- Environment
- Obtain and convert PyTorch model to ONNX format
- Deploy model with ONNX Runtime through AzureML
Pre-requisites
The source code for this tutorial is published on GitHub.
To run on AzureML, you need:
- an Azure subscription
- an Azure Machine Learning Workspace (see the AzureML configuration notebook for creation of the workspace if you do not already have one)
- the Azure Machine Learning SDK
- the Azure CLI and the Azure Machine learning CLI extension (> version 2.2.2)
You might also find the following resources useful:
- Understand the architecture and terms introduced by Azure Machine Learning
- The Azure Portal allows you to track the status of your deployments.
If you do not have access to an AzureML subscription, you can run this tutorial locally.
Environment
To install dependencies directly run the following
pip install torch
pip install transformers
pip install azureml azureml.core
pip install onnxruntime
pip install matplotlib
To create a a Jupter kernel from your conda environment, run the following. Replace
conda install -c anaconda ipykernel
python -m ipykernel install --user --name=<kernel name>
Install the AzureML CLI extension, which is used in the deployment steps below
az login
az extension add --name ml
# Remove the azure-cli-ml extension if it is installed, as it is not compatible with the az ml extension
az extension remove azure-cli-ml
Obtain and convert PyTorch model to ONNX format
In the code below, we obtain a BERT model fine-tuned for question answering with the SQUAD dataset from HuggingFace.
If you’d like to pre-train a BERT model from scratch, follow the instructions in Pre-train BERT model. And if you would like to fine-tune the model with your own dataset, refer to AzureML BERT Eval Squad or AzureML BERT Eval GLUE.
Export the model
Use the PyTorch ONNX exporter to create a model in ONNX format, to be run with ONNX Runtime.
import torch
from transformers import BertForQuestionAnswering

model_name = "bert-large-uncased-whole-word-masking-finetuned-squad"
model_path = "./" + model_name + ".onnx"
model = BertForQuestionAnswering.from_pretrained(model_name)

# set the model to inference mode
# It is important to call torch_model.eval() or torch_model.train(False) before exporting the model,
# to turn the model to inference mode. This is required since operators like dropout or batchnorm
# behave differently in inference and training mode.
model.eval()

# Generate dummy inputs to the model. Adjust if necessary
inputs = {
        'input_ids':   torch.randint(32, [1, 32], dtype=torch.long), # list of numerical ids for the tokenized text
        'attention_mask': torch.ones([1, 32], dtype=torch.long),     # dummy list of ones
        'token_type_ids':  torch.ones([1, 32], dtype=torch.long)     # dummy list of ones
    }

symbolic_names = {0: 'batch_size', 1: 'max_seq_len'}
torch.onnx.export(model,                                         # model being run
                  (inputs['input_ids'],
                   inputs['attention_mask'],
                   inputs['token_type_ids']),                    # model input (or a tuple for multiple inputs)
                  model_path,                                    # where to save the model (can be a file or file-like object)
                  opset_version=11,                              # the ONNX version to export the model to
                  do_constant_folding=True,                      # whether to execute constant folding for optimization
                  input_names=['input_ids',
                               'input_mask',
                               'segment_ids'],                   # the model's input names
                  output_names=['start_logits', "end_logits"],   # the model's output names
                  dynamic_axes={'input_ids': symbolic_names,
                                'input_mask' : symbolic_names,
                                'segment_ids' : symbolic_names,
                                'start_logits' : symbolic_names,
                                'end_logits': symbolic_names})   # variable length axes
Run the ONNX model with ONNX Runtime
The following code runs the ONNX model with ONNX Runtime. You can test it locally before deploying it to Azure Machine Learning.
The init() function is called at startup, performing the one-off operations such as creating the tokenizer and the ONNX Runtime session.
The run() function is called when we run the model using the Azure ML endpoint. Add necessary preprocess() and postprocess() steps.
For local testing and comparison, you can also run the PyTorch model.
import os
import logging
import json
import numpy as np
import onnxruntime
import transformers
import torch

# The pre process function take a question and a context, and generates the tensor inputs to the model:
# - input_ids: the words in the question encoded as integers
# - attention_mask: not used in this model
# - token_type_ids: a list of 0s and 1s that distinguish between the words of the question and the words of the context
# This function also returns the words contained in the question and the context, so that the answer can be decoded into a phrase.
def preprocess(question, context):
    encoded_input = tokenizer(question, context)
    tokens = tokenizer.convert_ids_to_tokens(encoded_input.input_ids)
    return (encoded_input.input_ids, encoded_input.attention_mask, encoded_input.token_type_ids, tokens)

# The post process function maps the list of start and end log probabilities onto a text answer, using the text tokens from the question
# and context.
def postprocess(tokens, start, end):
    results = {}
    answer_start = np.argmax(start)
    answer_end = np.argmax(end)
    if answer_end >= answer_start:
        answer = tokens[answer_start]
        for i in range(answer_start+1, answer_end+1):
            if tokens[i][0:2] == "##":
                answer += tokens[i][2:]
            else:
                answer += " " + tokens[i]
        results['answer'] = answer.capitalize()
    else:
        results['error'] = "I am unable to find the answer to this question. Can you please ask another question?"
    return results

# Perform the one-off initialization for the prediction. The init code is run once when the endpoint is setup.
def init():
    global tokenizer, session, model

    model_name = "bert-large-uncased-whole-word-masking-finetuned-squad"
    model = transformers.BertForQuestionAnswering.from_pretrained(model_name)

    # use AZUREML_MODEL_DIR to get your deployed model(s). If multiple models are deployed,
    # model_path = os.path.join(os.getenv('AZUREML_MODEL_DIR'), '$MODEL_NAME/$VERSION/$MODEL_FILE_NAME')
    model_dir = os.getenv('AZUREML_MODEL_DIR')
    if model_dir == None:
        model_dir = "./"
    model_path = os.path.join(model_dir, model_name + ".onnx")

    # Create the tokenizer
    tokenizer = transformers.BertTokenizer.from_pretrained(model_name)

    # Create an ONNX Runtime session to run the ONNX model
    session = onnxruntime.InferenceSession(model_path, providers=["CPUExecutionProvider"])


# Run the PyTorch model, for functional and performance comparison
def run_pytorch(raw_data):
    inputs = json.loads(raw_data)

    model.eval()

    logging.info("Question:", inputs["question"])
    logging.info("Context: ", inputs["context"])

    input_ids, input_mask, segment_ids, tokens = preprocess(inputs["question"], inputs["context"])
    model_outputs = model(torch.tensor([input_ids]),  token_type_ids=torch.tensor([segment_ids]))
    return postprocess(tokens, model_outputs.start_logits.detach().numpy(), model_outputs.end_logits.detach().numpy())

# Run the ONNX model with ONNX Runtime
def run(raw_data):
    logging.info("Request received")
    inputs = json.loads(raw_data)
    logging.info(inputs)

    # Preprocess the question and context into tokenized ids
    input_ids, input_mask, segment_ids, tokens = preprocess(inputs["question"], inputs["context"])
    logging.info("Running inference")

    # Format the inputs for ONNX Runtime
    model_inputs = {
        'input_ids':   [input_ids],
        'input_mask':  [input_mask],
        'segment_ids': [segment_ids]
        }

    outputs = session.run(['start_logits', 'end_logits'], model_inputs)
    logging.info("Post-processing")

    # Post process the output of the model into an answer (or an error if the question could not be answered)
    results = postprocess(tokens, outputs[0], outputs[1])
    logging.info(results)
    return results


if __name__ == '__main__':
    init()

    input = "{\"question\": \"What is Dolly Parton's middle name?\", \"context\": \"Dolly Rebecca Parton is an American singer-songwriter\"}"

    run_pytorch(input)
    print(run(input))
Deploy model with ONNX Runtime through AzureML
Now that we have the ONNX model and the code to run it with ONNX Runtime, we can deploy it using Azure ML.
Check your environment
import azureml.core
import onnxruntime
import torch
import transformers

print("Transformers version: ", transformers.__version__)
torch_version = torch.__version__
print("Torch (ONNX exporter) version: ", torch_version)
print("Azure SDK version:", azureml.core.VERSION)
print("ONNX Runtime version: ", onnxruntime.__version__)
Load your Azure ML workspace
We begin by instantiating a workspace object from the existing workspace created earlier in the configuration notebook.
Note that, the following code assumes you have a config.json file containing the subscription information in the same directory as the notebook, or in a sub-directory called .azureml. You can also supply the workspace name, subscription name, and resource group explicitly using the Workspace.get() method.
import os
from azureml.core import Workspace

ws = Workspace.from_config()
print(ws.name, ws.location, ws.resource_group, ws.subscription_id, sep = '\n')
Register your model with Azure ML
Now we upload the model and register it in the workspace.

from azureml.core.model import Model

model = Model.register(model_path = model_path,                 # Name of the registered model in your workspace.
                       model_name = model_name,            # Local ONNX model to upload and register as a model
                       model_framework=Model.Framework.ONNX ,   # Framework used to create the model.
                       model_framework_version=torch_version,   # Version of ONNX used to create the model.
                       tags = {"onnx": "demo"},
                       description = "HuggingFace BERT model fine-tuned with SQuAd and exported from PyTorch",
                       workspace = ws)
Display your registered models
You can list out all the models that you have registered in this workspace.
models = ws.models
for name, m in models.items():
    print("Name:", name,"\tVersion:", m.version, "\tDescription:", m.description, m.tags)

#     # If you'd like to delete the models from workspace
#     model_to_delete = Model(ws, name)
#     model_to_delete.delete()
Deploy the model and scoring code as an AzureML endpoint
Note: the endpoint interface of the Python SDK has not been publicly released yet, so for this section, we will use the Azure ML CLI.
There are three YML files in the yml folder:
env.yml: A conda environment specification, from which the execution environment of the endpoint will be generatedendpoint.yml: The endpoint specification, which simply contains the name of the endpoint and the authorization methoddeployment.yml: The deployment specification, which contains specifications of the scoring code, model, and environment. You can create multiple deployments per endpoint, and route different amounts of traffic to the deployments. For this example, we will create only one deployment.
The deployment can take up to 15 minutes. Note also that all of the files in the directory with the notebook will be uploaded into the docker container that forms the basis of your endpoint, including any local copies of the ONNX model (which has already been deployed to AzureML in the previous step). To reduce the deployment time remove any local copies of large files, before creating the endpoint.
az ml online-endpoint create --name question-answer-ort --file yml/endpoint.yml --subscription {ws.subscription_id} --resource-group {ws.resource_group} --workspace-name {ws.name}
az ml online-deployment create --endpoint-name question-answer-ort --name blue --file yml/deployment.yml --all-traffic --subscription {ws.subscription_id} --resource-group {ws.resource_group} --workspace-name {ws.name}
Test the deployed endpoint
The following command runs the deployed question answer model. There is a test question in the test-data.json file. You can edit this file with your own question and context.
az ml online-endpoint invoke --name question-answer-ort --request-file test-data.json --subscription {ws.subscription_id} --resource-group {ws.resource_group} --workspace-name {ws.name}
If you’ve made it this far, you’ve deployed a working endpoint that answers a question using an ONNX model.
You can supply your own questions and context to answer a question!
Clean up Azure resources
The following command deletes the AzureML endpoint that you have deployed. You may also want to clean up your AzureML workspace, compute, and registered models.
az ml online-endpoint delete --name question-answer-ort --yes --subscription {ws.subscription_id} --resource-group {ws.resource_group} --workspace-name {ws.name}