Image recognition with ResNet50v2 in C#
The sample walks through how to run a pretrained ResNet50 v2 ONNX model using the Onnx Runtime C# API.
The source code for this sample is available here.
Contents
Prerequisites
To run this sample, you’ll need the following things:
- Install .NET Core 3.1 or higher for you OS (Mac, Windows or Linux).
- Download the ResNet50 v2 ONNX model to your local system.
- Download this picture of a dog to test the model. You can also use any image you like.
Getting Started
Now we have everything set up, we can start adding code to run the model on the image. We’ll do this in the main method of the program for simplicity.
Read paths
Firstly, let’s read the path to the model and path to the image we want to test in through program arguments:
string modelFilePath = args[0];
string imageFilePath = args[1];
Read image
Next, we will read the image in using the cross-platform image library ImageSharp:
using Image<Rgb24> image = Image.Load<Rgb24>(imageFilePath, out IImageFormat format);
Note, we’re specifically reading the Rgb24 type so we can efficiently preprocess the image in a later step.
Resize image
Next, we will resize the image to the appropriate size that the model is expecting; 224 pixels by 224 pixels:
using Stream imageStream = new MemoryStream();
image.Mutate(x =>
{
    x.Resize(new ResizeOptions
    {
        Size = new Size(224, 224),
        Mode = ResizeMode.Crop
    });
});
image.Save(imageStream, format);
Note, we’re doing a centered crop resize to preserve aspect ratio.
Preprocess image
Next, we will preprocess the image according to the requirements of the model:
// We use DenseTensor for multi-dimensional access to populate the image data
var mean = new[] { 0.485f, 0.456f, 0.406f };
var stddev = new[] { 0.229f, 0.224f, 0.225f };
DenseTensor<float> processedImage = new(new[] { 1, 3, 224, 224 });
image.ProcessPixelRows(accessor =>
{
    for (int y = 0; y < accessor.Height; y++)
    {
        Span<Rgb24> pixelSpan = accessor.GetRowSpan(y);
        for (int x = 0; x < accessor.Width; x++)
        {
            processedImage[0, 0, y, x] = ((pixelSpan[x].R / 255f) - mean[0]) / stddev[0];
            processedImage[0, 1, y, x] = ((pixelSpan[x].G / 255f) - mean[1]) / stddev[1];
            processedImage[0, 2, y, x] = ((pixelSpan[x].B / 255f) - mean[2]) / stddev[2];
        }
    }
});
Here, we’re creating a Tensor of the required size (batch-size, channels, height, width), accessing the pixel values, preprocessing them and finally assigning them to the tensor at the appropriate indicies.
Setup inputs
Next, we will create the inputs to the model:
// Pin tensor buffer and create a OrtValue with native tensor that makes use of
// DenseTensor buffer directly. This avoids extra data copy within OnnxRuntime.
// It will be unpinned on ortValue disposal
using var inputOrtValue = OrtValue.CreateTensorValueFromMemory(OrtMemoryInfo.DefaultInstance,
    processedImage.Buffer, new long[] { 1, 3, 224, 224 });

var inputs = new Dictionary<string, OrtValue>
{
    { "data", inputOrtValue }
}
To check the input node names for an ONNX model, you can use Netron to visualise the model and see input/output names. In this case, this model has data as the input node name.
Run inference
Next, we will create an inference session and run the input through it:
using var session = new InferenceSession(modelFilePath);
using var runOptions = new RunOptions();
using IDisposableReadOnlyCollection<OrtValue> results = session.Run(runOptions, inputs, session.OutputNames);
Postprocess output
Next, we will need to postprocess the output to get the softmax vector, as this is not handled by the model itself:
// We copy results to array only to apply algorithms, otherwise data can be accessed directly
// from the native buffer via ReadOnlySpan<T> or Span<T>
var output = results[0].GetTensorDataAsSpan<float>().ToArray();
float sum = output.Sum(x => (float)Math.Exp(x));
IEnumerable<float> softmax = output.Select(x => (float)Math.Exp(x) / sum);
Other models may apply a Softmax node before the output, in which case you won’t need this step. Again, you can use Netron to see the model outputs.
Extract top 10
Next, we will extract the top 10 class predictions:
IEnumerable<Prediction> top10 = softmax.Select((x, i) => new Prediction { Label = LabelMap.Labels[i], Confidence = x })
                                       .OrderByDescending(x => x.Confidence)
                                       .Take(10);
Print results
Next, we will print the top 10 results to the console:
Console.WriteLine("Top 10 predictions for ResNet50 v2...");
Console.WriteLine("--------------------------------------------------------------");
foreach (var t in top10)
{
    Console.WriteLine($"Label: {t.Label}, Confidence: {t.Confidence}");
}
Running the program
Now the program is created, we can run it will the following command:
dotnet run [path-to-model] [path-to-image]
e.g.
dotnet run ~/Downloads/resnet50-v2-7.onnx ~/Downloads/dog.jpeg
Running this on the following image:
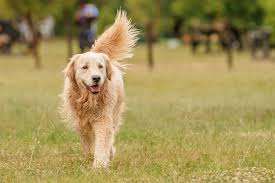
We get the following output:
Top 10 predictions for ResNet50 v2...
--------------------------------------------------------------
Label: Golden Retriever, Confidence: 0.9212826
Label: Kuvasz, Confidence: 0.026514154
Label: Clumber Spaniel, Confidence: 0.012455719
Label: Labrador Retriever, Confidence: 0.004103844
Label: Saluki, Confidence: 0.0033182495
Label: Flat-Coated Retriever, Confidence: 0.0032045357
Label: English Setter, Confidence: 0.002513516
Label: Brittany, Confidence: 0.0023459378
Label: Cocker Spaniels, Confidence: 0.0019343802
Label: Sussex Spaniel, Confidence: 0.0019247672